Arduino is a powerful tool that helps designers, engineers, and hobbyists bring interactive ideas to life without needing a background in electrical engineering or computer science. Whether you’re creating a smart device, an interactive installation, or a simple prototype, Arduino offers an accessible gateway into the world of physical computing. In this article, we’ll give you a clear overview of Arduino for beginners, walk through use cases relevant to product design, outline a typical workflow, and share tips to help you get started, even if you’ve never written a line of code before.
What is Arduino?
Arduino is an open-source microcontroller hardware and software platform for electrical projects. It allows designers to create, test, and iterate circuits rapidly. It can be used with a wide array of sensors to quickly add features to any project. Arduino’s electronics platform consists of two main components:
- Hardware – Small, programmable circuit boards like the Arduino Uno, Nano, and Leonardo.
- Software – The Arduino IDE (Integrated Development Environment), which lets you write and upload code to the board.
Originally developed in Italy in the early 2000s, Arduino was created to make microcontroller programming more accessible to designers, students, and creatives. Unlike traditional development boards that required deep technical knowledge, Arduino was built with simplicity and education in mind.
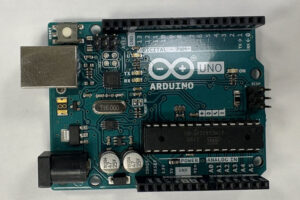
The original design, the Arduino Uno, was a simple microcontroller with limited memory and processing power; however, it featured easily accessible digital and analog GPIO (general purpose input/output) pins, which made it easy to integrate with other sensors and controllers.
Recently, the Arduino platform has become much more advanced with the capability to add Bluetooth, Wi-Fi, and cellular to projects for a nominal cost. Some Arduino boards can even integrate basic AI functionality onto prototype boards. Many newer Arduino boards also come with onboard sensors such as gyroscopes, temperature sensors, humidity sensors, microphones, and LEDs.
At its core, Arduino enables you to read inputs (like a button press, temperature reading, or motion detection) and control outputs (like turning on LEDs, spinning motors, or displaying messages) using relatively simple code, or sketch as it is referred to in the Arduino world. The open-source nature of Arduino means that thousands of free code libraries and project tutorials are available on the internet. Arduino provides an easily accessible entry point to incorporating features like sensors and dynamic inputs and outputs into a project.
How Arduino helps product designers
Arduino empowers product designers to prototype and test interactive features, letting you:
- Rapidly iterate ideas using the Arduino serial monitor.
- Gather real-time feedback, because you can see what’s going on inside the code and inside your circuit in real time.
- Validate feasibility before committing to full production.
- Leverage existing resources to rapidly develop a prototype.

The Arduino Nano 33BLE is the smallest available board, making it ideal for wearable devices.
What is an example of an Arduino workflow?
Let’s walk through a basic example of how you might approach designing an Arduino-controlled system. Say you want to build a temperature-controlled fan that turns on when a room gets too warm. You’ll need to define what the system should do, select appropriate components, and then write code that brings it all together. The steps below outline how to turn that idea into a working prototype.
Step 1: Define the behavior
Define how you want the system to work in simple words. “I want a fan to turn on when the temperature gets too warm, and I want it to spin faster as the temperature increases.” Think about which parts of the circuit are inputs, and which parts are outputs. In this case, the input is a temperature sensor, and the output is the fan. The Arduino will read the temperature and control the fan speed accordingly.
Step 2: Choose your components
Identify what components you will need to get the circuit to behave as you expected. A plethora of different sensors are available that can measure temperature, pressure, humidity, pH, CO2, light, distance, force, strain, flow, touch, and more. Adafruit.com, Sparkfun.com, and DFROBOT.com are all manufacturers of development boards and sensors designed for use with Arduino and other microcontrollers. They often provide detailed tutorials on how to connect the sensor and usually include a code library that greatly simplifies working with the sensor. In our fan example, you’d need a temperature sensor (like an LM35 or TMP36), a fan, and a transistor so the Arduino can control the fan’s power using PWM.
Step 3: Build the circuit
Breadboards and jumper wires are invaluable tools for quickly assembling circuits without soldering. In a breadboard, all holes in a single row are connected to each other, so placing two wires in the same row is analogous to soldering them together. Breadboards provide flexibility for quickly assembling and modifying circuits. Online tutorials will often include circuit diagrams for integrating a new sensor.
To make the fan circuit, you would need to connect the temperature sensor to an analog input pin and the fan to a PWM output pin through a transistor. This setup lets the Arduino monitor temperature and adjust the fan speed.
Step 4: Write the code
Arduino code is based on C++, but don’t worry if you aren’t a proficient coder. Arduino code consists of a setup block, which runs once at the beginning of the program, and a loop, which runs continuously as long as the Arduino has power.
There are thousands of online tutorials detailing how to get started with Arduino and coding. When using a new sensor, start with an Arduino code library designed for that sensor. Look at example code of others using the sketch and try to understand how it works.
AI tools are also adept at writing code to work with Arduino. Because Arduino is open-source, AI models have had access to huge quantities of training data, making them quite proficient at writing code. However, debugging might require a bit of hands-on tweaking if the code does not work as intended. When prompting an AI to write code, be sure to specify that you are writing an Arduino sketch, and be sure to tell it to include comments.
To get your fan to work, you would need to write code that reads the analog value from the temperature sensor, converts it to a temperature, and maps that value to a PWM signal. Higher temperatures result in faster fan speeds.
Step 5: Upload and test
Once you’ve started to understand how the basic code works, it’s time to start making changes to variables or functions and verify that the code behaves as expected. Once you understand how to use a single sensor or output, you can begin to combine multiple inputs and outputs into a complex design.
Finalize your fan project by uploading your sketch and testing the system. As the sensor heats up (try touching it or blowing warm air), the fan should turn on and spin faster. If not, check your wiring, sensor readings, and PWM output.
Helpful Arduino tips and tricks for beginners
Arduino is designed to be beginner-friendly, but a few insights can make your learning curve smoother:
Start with kits
Beginner kits provide curated components (like LEDs, buttons, sensors) and pre-written example projects. This reduces setup friction and helps you learn through hands-on experience.
Use online resources
The Arduino community is vast. Websites like Arduino.cc, Instructables, and the Arduino subreddit are full of tutorials, code snippets, and project ideas. Adafruit.com, Sparkfun.com, and DFROBOT.com are all electronics manufacturers that create step-by-step tutorials and instructions on how to use their products, which are much more accessible than technical datasheets.
Copy and modify code
Don’t be afraid to copy existing code and tweak it. This is a great way to learn. Start by changing a variable or pin number and note the results.
Think in inputs and outputs
All Arduino projects ultimately boil down to reading inputs (such as sensors and buttons) and controlling outputs (like lights, motors, and sound). Understanding this simple model helps demystify more complex projects. Typically, the microcontroller, in this case an Arduino, can be thought of as the central hub. It receives inputs, processes the information received based on the code, and then performs the appropriate output.

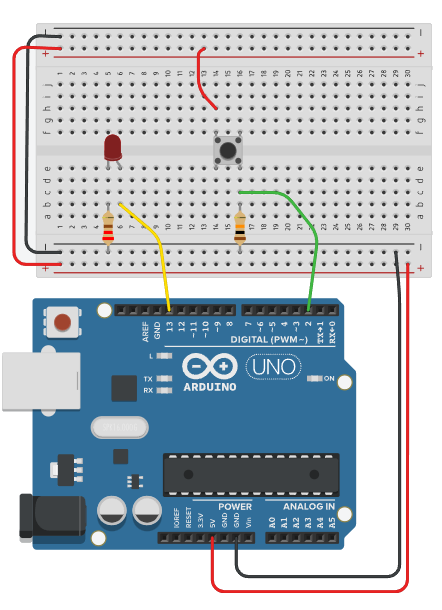
This diagram shows a simple pushbutton circuit using an Arduino. In this example, the pushbutton is the input and the LED is the output. When the button is pressed, a HIGH signal is passed to pin 2 on the Arduino. The code instructs the Arduino to send a HIGH signal to the LED on pin 13 when the button is pressed, which causes it to light up.
Breadboard everything first
Use a breadboard for prototyping so you can easily swap components without soldering. Once your design is working reliably, you can move to a more permanent setup.
Use libraries
Many sensors and modules come with libraries, chunks of code that simplify setup and communication. Instead of writing low-level code to talk to a temperature sensor, you can just use a library with simple commands like getTemperature().
Modularize your design
Break your prototype into modular blocks. For example, one block handles motion sensing, another controls lights, and another logs data. This mirrors good product design practices and makes debugging easier.
Don't fear the code
Arduino code is written in C/C++, but the syntax is simplified, and examples are everywhere. Most projects require only a few dozen lines of code. With a little practice, it becomes second nature. AI tools, such as ChatGPT, are quite good at writing code for Arduino applications. However, if you use an AI tool to write your code, you may have a difficult time understanding or debugging it.
Avoid these common pitfalls
- Power Issues: Make sure your board and components are receiving the correct voltage. Too little, and it won’t work; too much, and things can burn out.
- Loose Wires: Breadboards can be finicky. If something isn’t working, double-check connections.
- Wrong Pins: Double-check that your code matches the physical pin layout.
- Debug with Serial.print(): Outputting values to the serial monitor is incredibly helpful for diagnosing issues.
When NOT to use Arduino
Arduino is a fantastic prototyping tool, especially for early-stage product design, but it’s not always the right choice for every project. Here are some situations where Arduino might be inappropriate:
1. Production-grade products
Arduino boards are great for prototypes, but they are not typically designed for mass production. They often have:
- Larger footprints
- Exposed components and header pins
- Higher power consumption
- Non-optimized circuitry
A better alternative is custom-designed PCBs with optimized microcontrollers (e.g., ARM Cortex chips, ESP32 modules) tailored for production use.
2. Projects requiring high performance
Arduino boards (like the Uno) are based on 8-bit microcontrollers with limited CPU speed (16 MHz), RAM (2 KB), and storage. This becomes a problem if your project needs:
- Real-time image processing
- High-speed data acquisition
- Complex audio or video streaming
3. Advanced communication protocols
Arduino’s built-in libraries are great for basic communication (I2C, SPI, UART), but they can be insufficient or inefficient for:
- High-bandwidth wireless communication
- Industrial protocols like CAN, Modbus, or RS-485
- Secure HTTPS APIs or TLS-based IoT systems
4. Ultra-low power applications
Most Arduino boards draw too much power for battery-operated, long-life devices like:
- Remote environmental sensors
- Wearables that need weeks or months of uptime
- Sleep-mode critical devices
5. Safety-critical systems
If you’re designing something that must not fail (e.g., medical devices, automotive controls, or industrial safety systems), Arduino is not suitable because:
- It lacks fault-tolerant architecture
- It doesn’t meet certification standards like ISO 26262 or IEC 60601
- It is not subject to rigorous QA or compliance
6. Long-term maintenance or scalability
Arduino sketches (the coding structure) are ideal for learning and prototyping, but can become hard to scale or maintain in:
- Large, modular applications
- Projects with multiple developers
- Systems requiring version control and CI/CD pipelines
Arduino invites you to experiment, prototype, and iterate with electronics the same way you do with sketches or 3D models. You don’t need to become an electrical engineer to bring interactivity into your designs. By adding Arduino to your toolkit, you’re expanding your creative potential and gaining more control over how your products look, feel, and behave. So grab a kit, start tinkering, and see where your ideas take you.
About Synectic Product Development: Synectic Product Development is an ISO 13485 certified, full-scale product development company. Vertically integrated within the Mack Group, our capabilities allow us to take your design from concept to production. With over 40 years of experience in design, development, and manufacturing, we strive for ingenuity, cost-effectiveness, and aesthetics in our designs.